4.7 Capturing facial biometrics
Capturing facial biometrics requires the Aware PreFace software, which is provided separately. Contact your account manager for licensing details.
See the Installing the Aware PreFace software for facial biometrics section in the Installation and Configuration Guide for instructions on installing the Aware PreFace software.
You can capture facial biometrics either from a live camera feed or from a still image.
4.7.1 Requirements for facial biometrics
You require a digital camera that is supported by Aware PreFace.
The MyID Image Capture component has been tested with the following cameras:
- Canon EOS Rebel T3
- Canon EOS Rebel T5i
- Canon EOS Rebel T7
Other Canon EOS Rebel camera models are expected to behave in the same way. If you want to use another camera that is supported by Aware PreFace but has not been tested with MyID, contact Intercede customer support quoting reference SUP-304.
Note: You must set your Canon camera to Tv mode by setting the dial on top of the camera to Tv.
Enabling support for webcams
MyID can support facial biometric capture using a webcam with Aware PreFace. The MyID Image Capture component has been tested with the following camera:
- Logitech HD Pro Webcam C920
Alternative webcams may be detected on your computer; however, not all may work with Aware PreFace or produce suitable results for capturing facial biometric data. It is recommended that other webcams not suitable for use with Aware PreFace are disconnected or disabled using Windows device manager on your enrollment station.
4.7.2 Configuring MyID for facial biometrics
To allow facial capture within MyID:
- In MyID Desktop, from the Configuration category, select Operation Settings.
-
On the Biometrics tab, set the following option:
- Enable Facial Capture – set to Yes to allow facial biometrics capture.
- Click Save changes.
Note: See section 8.2.1, Setting configuration options.
4.7.3 Saving non-compliant images
You can configure the MyID Image Capture control to prevent you from saving images that do not meet the compliance requirements of the selected image profile. If you want to be able to save non-compliant images, set the following configuration option:
- In MyID Desktop, from the Configuration category, select Operation Settings.
-
On the Biometrics tab, set the following option:
- Allow Aware PreFace control to capture non-compliant images – set to Yes to allow operators to save images that do not meet the compliance requirements of the selected profile, or No to prevent operators from saving such images.
- Click Save changes.
Note: See section 8.2.1, Setting configuration options.
MyID must attempt to make the image conform to the minimum requirements (for example, the size of the file and the file format) even if it cannot meet all of the compliance requirements.
When importing an image, or changing profiles, you must click the Optimize button before attempting to save the image.
If you are capturing an image using a camera, the optimization is carried out automatically.
If MyID cannot meet these minimum requirements, a message similar to the following is displayed:
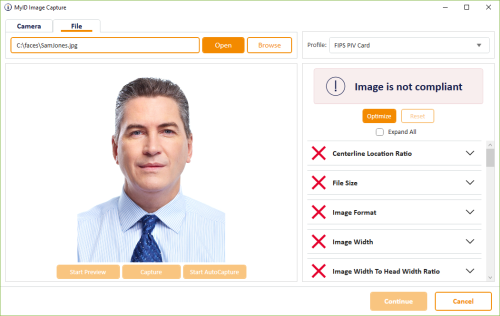
Image is not compliant
Optimization failed
In this case, you cannot upload the image to MyID, even if you have allowed MyID to capture non-compliant images.
4.7.4 Image profiles
The standard profile provided produces a suitable facial biometric and visual image for use with a PIV card. This uses the following profile supplied by Aware Biometrics:
- fips_piv_card.xml
This profile results in the construction of PIV card-compliant facial images consistent with the normative specifications outlined in the ANSI INCITS 385-2004 and conforming to NIST Special Publication 800-76 Biometric Specifications for Personal Identity Verification. Output images are stored using ROI-based JPEG2000 image compression to achieve maximum compression rates.
You can add further profiles to your installation to support other use cases, and can set a default profile. Modifying profiles requires manual changes to a configuration file; for help with this, contact customer support, quoting reference SUP-280.
4.7.5 Capturing facial biometrics from a live camera feed
To capture an image from a live camera feed:
-
On the BIOMETRICS tab of the Edit PIV Applicant screen, click the CAPTURE button under the facial biometric image.
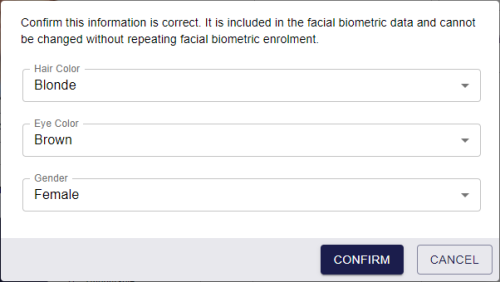
The biometrics information dialog appears.
-
Provide the following details:
- Hair Color – select the person's hair color from the drop-down list.
- Eye Color – select the person's eye color from the drop-down list.
- Gender – select the person's gender from the drop-down list.
Note: MyID attempts to obtain this information from the personal details on the BIOMETRICS tab. However, as these details are used for different purposes, there may not be an exact match, and MyID may have to approximate a match. Any changes you make on this dialog will not be reflected in the personal details on the BIOMETRICS tab.
-
Click CONFIRM.
The MyID Image Capture control appears.
-
On the Camera tab, select the camera from the drop-down list, and click Connect.
Note: If you connect or disconnect a camera, you can click Refresh List to update the list of available cameras.
Important: Do not disconnect or switch off a camera while it is displaying a preview feed – this may cause the Aware component to stop working.
If you do not already have an image loaded, the preview feed from the camera appears. If you have an image already loaded, click Start Preview to see the live feed from the camera.
-
Select the Profile from the list of available image profiles in the drop-down list.
By default, MyID Image Capture has one image profile; however, your system may have been customized to include further profiles with different requirements for image compliance. See section 4.7.4, Image profiles for details.
-
Adjust the image settings.
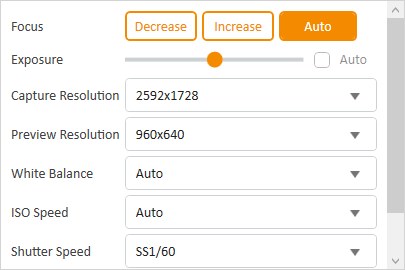
The settings available depend on the camera you are using; for example, a webcam has fewer options than a Canon Rebel SLR camera.
Any changes (for example, resolution or exposure) you make to the settings are stored on the client for that camera, and will be remembered the next time you select the camera in the MyID Image Capture control.
-
Capture the image.
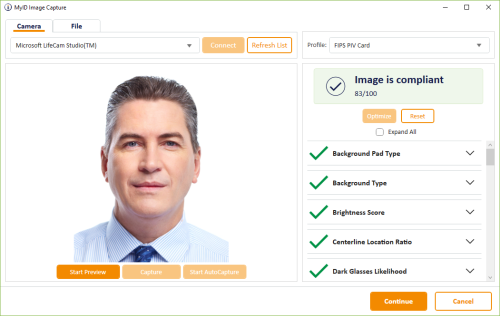
The feedback panel displays details about the compliance of the current image. This helps you to pose the subject for a compliant image.
For example:

Either:
-
Click Capture to capture the image currently being previewed.
or
-
Click Start AutoCapture, and the Image Capture control will automatically capture the image as soon as it detects a valid picture (for example, when the subject is facing the right way).
You can click Stop AutoCapture to stop the automatic capture process.
The Image Capture control automatically attempts to optimize the image for the profile you have selected.
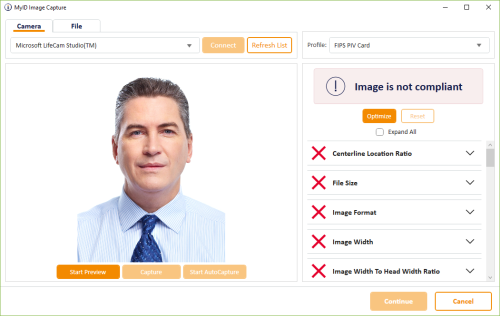
Depending on the quality of the source image, the result may not be fully compliant with the profile. The reasons for the lack of compliance appear in the bottom right of the screen; you can review these details.
Click Expand All to expand all of the compliance features.
-
-
If you change the profile, click Optimize.
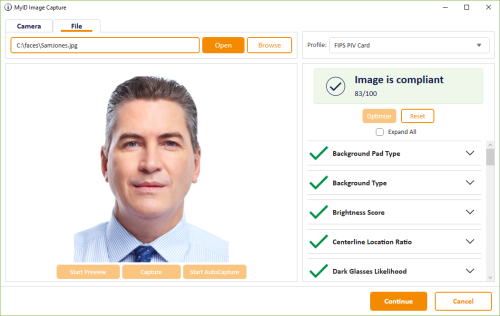
The Image Capture control attempts to turn the captured image into a compliant image for your profile. If it can do so, all of the red crosses turn to green ticks in the list of compliance features.
If the Image Capture control cannot create a compliant image from the image you have captured, click Start Preview to start the process of capturing another picture.
To reset the optimized image to the originally captured image, click Reset.
- Once you have a picture that you are happy with, click Continue to upload the facial biometrics to the MyID server.
Note: You can configure MyID to prevent you from selecting the Continue button if the image is not compliant. Seesection 4.7.3, Saving non-compliant images for details.
You can then complete the Edit PIV Applicant screen to save the user's record within MyID.
4.7.6 Capturing facial biometrics from a still image
To capture an image from a still image:
-
On the BIOMETRICS tab of the Edit PIV Applicant screen, click the camera icon under the facial biometric image.

The biometrics information dialog appears.
-
Provide the following details:
- Hair Color – select the person's hair color from the drop-down list.
- Eye Color – select the person's eye color from the drop-down list.
- Gender – select the person's gender from the drop-down list.
Note: MyID attempts to obtain this information from the personal details on the BIOMETRICS tab. However, as these details are used for different purposes, there may not be an exact match, and MyID may have to approximate a match. Any changes you make on this dialog will not be reflected in the personal details on the BIOMETRICS tab.
-
Click CONFIRM.
The MyID Image Capture control appears.
-
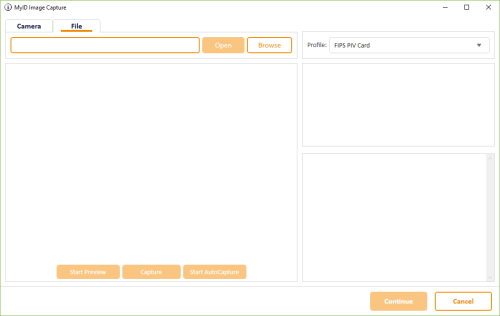
Click the File tab.
-
Click Browse and select an image file on your PC.
Alternatively, you can type the path of the file in the box, then click Open.
-
Select the Profile from the list of available image profiles in the drop-down list.
By default, MyID Image Capture has one image profile; however, your system may have been customized to include further profiles with different requirements for image compliance. See section 4.7.4, Image profiles for details.
The loaded image file may not be compliant with the profile you have selected. The reasons for the lack of compliance appear in the bottom right of the screen; you can review these details.
Click Expand All to expand all of the compliance features.
-
Click Optimize.
The Image Capture control attempts to turn the captured image into a compliant image for your profile. If it can do so, all of the red crosses turn to green ticks in the list of compliance features.
To reset the optimized image to the originally loaded image, click Reset.
-
Once you have a picture that you are happy with, click Continue to upload the facial biometrics to the MyID server.
Note: You can configure MyID to prevent you from selecting the Continue button if the image is not compliant. See section 4.7.3, Saving non-compliant images for details.
You can then complete the Edit PIV Applicant screen to save the user's record within MyID.
